This cover was created to fit the Pop-Up Tunnel Book of a previous post, but it may be used for other structures, such as small pamphlets.
Tools: pencil; bone folder; X-acto knife; metal ruler; tweezers; scissors, PVA and small piece of scrap board or glue brush; scrap paper to protect surfaces; four pieces of extra book board to use as a spacing guide
Materials: book boards, 4 1/8 x 3 1/8" (105 x 79 mm), grained short; book cloth, 10 1/4 x 4 1/2" (260 x 114 mm), grained short
Before you cover the boards, create an inset or recess for a title or image. In this example, I use an image on the front and a colophon on the back. The two boards are covered together with a space of four board thicknesses between them. The image and colophon are glued into the recesses after the boards are covered.
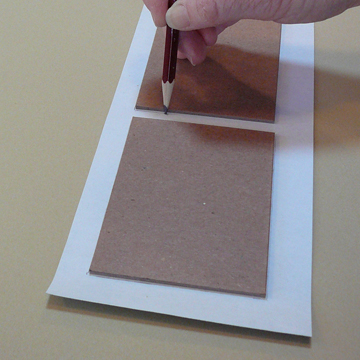
 |
| Draw around cover title or image onto the board |
 |
| Using X-Acto against metal ruler, cut the outline. |
 |
| Dig down at the corner. |
 |
| Pull up a couple layers of board. |
 |
| Keep peeling up the layers. |
 |
Repeat the process on the other board for
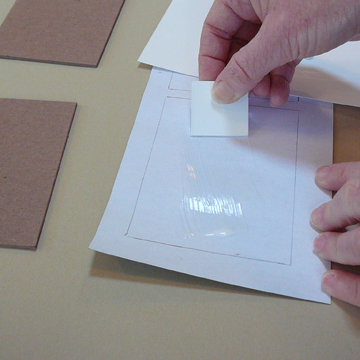
a colophon (or other image) for the back.
A tweezers may help you get a grip on the layers. |
 |
Place the boards on the back of the book cloth
with four board thicknesses between them. |
 |
| Draw around the boards. |
 |
| Apply glue to the inside of one drawn rectangle. |
 |
| Press the front cover in place, face down. |
 |
| Apply glue to second section for second board. |
 |
| Use a pencil against a board to draw lines across all corners. |
 |
| Cut corners just outside of the pencil lines. |
 |
| Cut all corners. |
 |
| Apply glue to the one long flap. |
 |
| To get a flat edge, press against the table. |
 |
| Press down the flap (turn-in). |
 |
Apply glue and turn in the parallel flap.
Smooth it down with bone folder. |
 |
At the corners, push or tuck in the book cloth
so you will not see raw board. |
 |
| Apply glue to one end flap. |
 |
Press down and smooth book cloth with bone folder.
Tuck the corners and repeat gluing for the opposite flap. |
 |
| Use bone folder to smooth down the recesses. |
 |
| Apply glue to the back of the front image. |
 |
| Place image into the recess. |
 |
Press down the image.
Repeat the process for the colophon (or back image). |
 |
| Apply glue to one side of the tunnel book |
 |
Press to cover, aligning the fold with the
edge of the board closest to the spine and
centered between head and tail. |
 |
| Apply glue to remaining side of tunnel. |
 |
| Close the cover, aligning the boards. |
 |
| Press down. |
This surprising little book fits in your palm, can be carried or stored easily, or can be given as a gift.


Comments
What a cute and lovely little book. I love this idea of a tunnel with images.
Thanks for the clear instructions (glad to see I've been doing my corners "right"!).
I think I'll have to have a go at this soon...